By Al Warfield–
After you’ve gone to the effort of taking the perfect shot, making the perfect print, and choosing the perfect frame, why spoil your image by framing it under glass where a myriad of reflections will wreck its beauty?

Even with special non-glare glass covering the print, reflections abound, destroying the delicate nuances of the spider web. Photo © Al Warfield
It’s easy to eliminate reflections on framed prints made with Red River Matte and Fine Art Matte papers; you’ll also have the added advantage of displaying an image as large as the frame size instead of a smaller print inside a mat. Yet it’s also possible to create any sized border in Photoshop if you want to have separation from the frame.
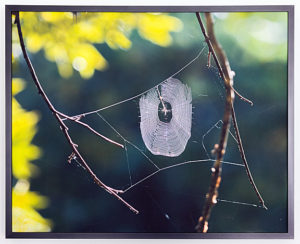
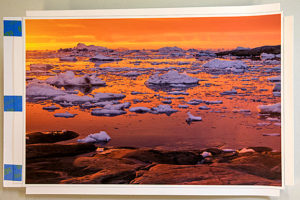
DIsplayed without glass and protected with a special coating, reflections are eliminated showing all the detail in the print. Photo © Al Warfield
To secure the image within the frame, the photo must be mounted to acid-free foam core with a photo grade adhesive spray. Matte or fine art matte inkjet papers like Aurora Art Natural, Palo Duro Etching, or 60 lb. River Linen 2.0 are good choices–they’re easy to mount due to the absorbency of the paper back. They can be either textured or smooth. Thicker papers work better because they are easier to align properly with the board, but papers of normal thickness can be used as well.
You can also use this method with non-matte papers including Arctic Polar Luster, and San Gabriel Semi Gloss Fiber. They work, and will stay flat against the foam core for awhile but may start to separate from the backing in a few months due to the slick back on these papers. In most cases you can prevent this by spraying 3 coats of adhesive to improve adhesion.
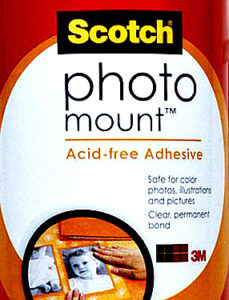
There are many photo mount spray adhesives on the market. Be sure the one you choose says: “Acid Free.”
Begin by working in a well-ventilated room. You may want to use a face mask and some eye protection for the spraying procedures described below.
A homemade spray booth can be made from a three-sided cardboard box. If spraying outside, do it in an area that’s wind-free.
You’ll need photo grade spray adhesive such as Scotch Photo Mount Acid Free to attach the print, and acid-free foam core for the backing, both available in artists’ supply stores.For small prints I use 1/8” acid-free foam core, but for 16×20” or larger, I prefer at least 3/16” material for stability.
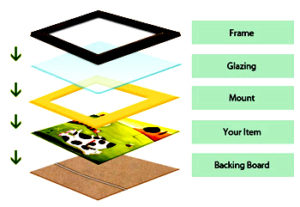
Anatomy of a traditional frame. Glazing, mount and backing board are not required in the non-reflective framing method. The print, mounted on foam core, replaces the backing board which is only used as a measuring guide.
Begin by cutting the foam core to the nominal dimensions of the frame plus 1-2 inches in the longest dimension (e.g.,12×16” if it is a 12×14” frame). The extra length will be needed later for alignment of the print with the board before the mounting step. The nominal frame size is the size of backing board that comes with most frames which you can use as a cutting guide for the width of the foam.
When printing your image, make sure you center it on paper that is at least 1 inch larger than the nominal frame size (the size of the backing board) in both dimensions (e.g., a 12×14” print should be printed on at least 13×15” paper). Then you have two choices. 1) You can print it at the nominal frame size and allow the frame’s inside edges to overlap the image about 1/4″ on each side, or 2) you can opt have the total image viewable. The first method is the easiest as you will print your image at its normal size and the “cropping” of ¼-inch off each side may be negligible.
The second requires you to decrease the size of your image slightly so that none of it is hidden by the frame edges. Then you increase the canvas size (which is the same size as your image) back to the nominal frame size to allow space to create a border around the image that will be concealed under the frame edges. This allows the full image to be visible. This is desirable in some cases so that the full image can be displayed without the frame edge covering part of the image area. (see Resources for tutorial link).
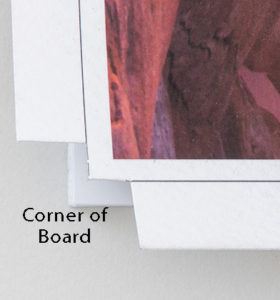
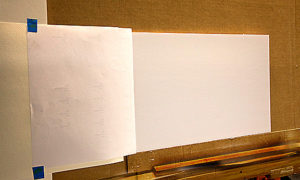
This image has a white border with a black outline. It has been cut to expose its corners which will then be aligned with the corresponding corners of the board beneath it. If it had no border, you would use the same procedure to make your cuts to expose the corners of the image.
To simplify the alignment of the print with the cut board, make a series of cuts that expose the four corners of the print. Apply a weight (I use a heavy straightedge) to the print to hold it in place, then align the exposed corners on the right with the corners of the board, and the corners on the left (the long edge) with the top and bottom of the board.
The print is taped to the foam core after aligning the edges of the print to the board. Photo © Al Warfield
Tape the print to the long end of the foam core board using high quality masking tape. This allows the print to be hinged back to expose the board for application of the adhesive.
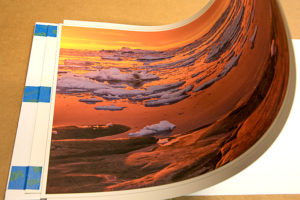
The back of the print is masked and and the assembly is raised to an almost vertical position, in readiness for spraying the adhesive.
The foam core with print attached is placed on a piece of cardboard and the print is hinged back out of the way while the board lies flat. Then attach a paper shield to protect the back of the print as spray is applied only to the board and not to the back of the print.
Then elevate the foam core to an almost vertical position, so that acid-free adhesive spray can be directed straight onto it. Make both horizontal and vertical passes to insure good coverage. NOTE: Do not use repositionable adhesive. It must be permanent or it will eventually delaminate.
After lowering the assembly to the table, remove the mask and gradually lower the print onto the board in a rolling motion from left to right, as shown
Next, keeping the print and foam core apart, place them back onto a flat surface. You can now remove the paper protecting the back of the print and then slowly bring the print into contact with the foam core, lowering it from one end to the other. As the print is being lowered onto the board, lay a piece of acid-free foam core on top of the print and apply hand pressure to seat it firmly in place.
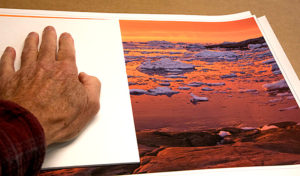
As the print starts to contact the board, use a piece of acid-free foam core to put pressure on it by hand, working from left to right.
This process is normally done starting from the left side, and moving to the right as the print is brought into contact with the board to assure good contact. Next, reapply more manual pressure over the whole print, then cover the print with plain paper, and place a piece of acrylic or another flat, rigid material over it and distribute some weight (heavy books will do) on it for 2-3 hours.
The next step is protection against environmental pollution and fading from exposure to Ultra Violet light. I use PremierArt Print Shield.
Prop the print up in a vertical position and spray two light coats, one horizontal and one vertical. Premier goes on as a fine mist from a distance of about 10-12 inches. NOTE: Spray parallel to the print; in other words, don’t rotate the can with your wrist; use your arm to move the spray rapidly and evenly to avoid possible drips. You can rotate the print if it is more convenient to spray side to side rather than up and down.
After 20-30 minutes repeat the process (a third coat doesn’t hurt and gives more protection), after which the mounted print is allowed to dry and harden for 2 hours or more. This gives protection from both atmospheric pollutants and UV light while keeping the look of a matte print.
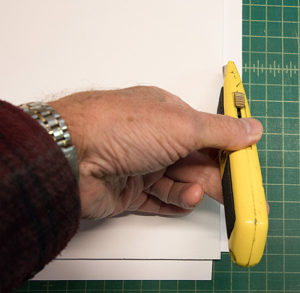
After the print is dry turn it over and cut off extra paper by using the edge of the board as a guide. Also cut the excess board to the same length as the nominal frame length (the length of the backing board).
After drying and hardening overnight, the extra paper on the edges of the mounted print can be removed by turning the print over (make sure to protect its surface) and trimming the edges with a box cutter (or razor knife), using the edges of the foam core as a cutting guide. I use a box cutter because the blade is stiffer and easier to control than a razor knife
Spraying Premier for protection works on non-matte print surfaces, too, but the prints tend to have more sheen than before spraying. On the other hand, Premier has sometimes removed blemishes due to abrasion or debris that was attached to the print surface and the print then looked normal.
It may take a bit of practice before your results start looking good. But the procedure is fairly simple, and the finished image can look spectacular.
ABOUT THE AUTHOR: Al Warfield and his wife Linda are professional photographers based in Richmond, VA. One of their specialties is the production of framed prints on Red River fine art matte papers that need no glazing and are basically reflection free. You may visit their website here or contact Al at: allindaphoto@gmail.com
RESOURCES
Supplies
Red River Papers: Aurora Art Natural, Palo Duro Etching, 60 lb. River Linen 2.0, Arctic Polar Luster, San Gabriel Semi Gloss Fiber.
Acid-free Foam Core Board. Available in 1/8″ and 3/16″ from art and photo supply sources.
Scotch Photo Mount Acid Free Photo Safe Adhesive (3M)
Image Border Tutorial
Definition of Terms
Nominal Frame Size: Used in this article to describe the size of backing board that the frame is designed to fit. So, if you buy a 12” x 14” frame, it is designed to fit a 12×14” piece of backing board on which a print will be attached.
Image Size: The actual size of the photographic image.
Document Size: The size of the paper that the image is printed on. For example, 8.5×11” letter-sized paper on which any image that will fit is printed.
Canvas Size: The document size that includes the image. (Not to be confused with the type or surface of paper the image is printed on). If the frame size is 12×14”, and we want to see the whole document in the frame, the Nominal size is 12×14”, the Canvas size is 12×14” and the Image size is 11.5×13.5” normally. (Some frames may have more or less than a 1/2” difference between the nominal size and the size that is open inside the frame. That can be determined by measuring the distances between the frame sides in both dimensions and subtracting that from the nominal size.) The border inside the frame is ½ the difference. Both dimensions have the same difference. That is, the amount of the print that would be hidden behind the frame edges. I have never run into any frames that don’t work with a ½” difference. But they probably exist.
A Working Example: If the image is opened in Photoshop and sized to 12×14”, the canvas size and image size are both the same as the nominal frame size: 12×14”.
If the image is resized to 11.5×13.5” and the canvas size is then increased to 12×14”, there will be a ¼” border around the image. NOTE: This is because the values you input are split between edges, so entering 1/2-inch in each field (horizontal and vertical) results in an overall border width of 1/4-inch.
This border will be covered by the frame. When the print is made, the paper will be (at least) 13×15”. There will be (at least) an additional ½” border remaining around the canvas size if the print is centered on the paper. Don’t confuse the canvas size with the paper size.


